In part 2 of this guide to writing your own toy operating system, we set out to write our own (floppy) disk boot sector in assembly code. We ended up with a piece of code that writes a message to the screen, initializes the drive system, waits for a key press, and reboots. Before we move in, let’s create a development environment: a toolset that we can use to compile and test our code repeatedly (and when fiddling with low-level assembly code, you’ll find that “repeatedly” is the operative word here).
Our code so far was written in for the GNU assembler, as, although we use the Intel syntax (which GNU supports) as this is easier on the eyes for most people (I like the GNU syntax, but if you’ve never used it, you’ll find that it requires looking at everything upside down). The GNU assembler is free, and any other tools we’ll use will also be free.
We’ll also use Windows as our development platform, which we’ll require some extra work to set things up.
This article is part of a series on toy operating system development.
Assembling & Linking
Assembling code turns that code into an object file. An object file contains machine code that the processor can execute. But before that, the object file must be linked into an executable. This is because programs in assembly code (or any other language) more often than not consist of many source files, which must be combined into one executable. The tool responsible for putting it all together is called a linker. It joins up all the code, and makes sure that all the references in that code (jumps, variables, memory references) actually point to the correct spot. It does all the math required to turn all references into numbers, so you don’t have to (a very good thing).
So: the next tool we’ll be using is the GNU linker, ld.
Getting the GNU toolchain: MinGW
The GNU assembler and the GNU linker are ideal tools for our purposes, but they are not readily available for Windows. You’ll find as and ld on any UNIX/Linux system, but not on Windows. Of course we could decide to use some Windows-based assembler, but these assembler simply don’t have enough switches to fiddle with, so it’s GNU or nothing.
Luckily, we have two options: Cygwin and MinGW. Both are complete GNU toolsets that were compiled for and run on Windows. Cygwin requires that you work in a special shell, while MinGW (“Minimalist GNU for Windows”) can be used directly from the ordinary Windows command line, which is how I like it. (You can still opt for Cygwin, it shouldn’t make any difference). So go and get a copy of MinGW here (or here for direct download) and install it. I’ll wait.
After installing MinGW, don’t forget to set your PATH to include your MinGW’s /bin directory. That way you’ll have access to as, ld and make from your shell.
Compiling the code
Now that we have MinGW, we can open a shell and find our code file (let’s call it boot.s). Here’s how we assemble the code:
$ as -o boot.o boot.sThis will turn boot.s into boot.o.
Now to link it:
$ ld -o boot.out boot.o -Ttext 0x7c00
$ objcopy -O binary -j .text boot.out boot.bin
That’s a mouthful. Here, we use the GNU linker to create a linked intermediary file. Normally, we could tell the linker which output format it should produce, and there are quite a few of those (Windows PE, Linux ELF, flat binary etc.). What we want is for the linker to produce a flat binary: no operating-system specific headers, just the code. And that’s just what we cannot do.
This is where objcopy comes in. It takes the linker output, strips off any headers and leaves us with a flat binary with just the code. It produces, in fact, a file of 532 bytes (on my computer), which is 20 bytes too many. Closer inspection with a hex editor shows that the code is in fact exactly 512 bytes and ld/objcopy added 20 excess bytes that we can ignore. (I have yet to find out why – when I compiled similar code some years ago this did not happen. Also see my post on linking a flat binary from C with MinGW.)
What we have now produced is exactly like a .com file in the olden days of DOS gone by. These files (as opposed to .exe files) also included just the code. You could run one, and DOS would know what to do with it. No such luck now: if you run your file (renaming it to .com or .exe) you’ll get this:

Booting
Of course, this is a good thing, because our code would bring Windows down if it were allowed to execute. Also, our code was written for 16-bits real mode, and your Windows computer is in protected mode. Thus, our boot loader can only be tested if we were to actually boot our computer with it, or within some sort of emulator (we can actually do both).
Bochs
There actually exists an emulator that we can use for our purposes. The good people of Bochs (“The Open Source IA-32 Emulation Project”) have produced a program that precisely emulates a computer with an Intel processor, loaded with a BIOS ROM and with support for common I/O devices. Bochs can run old DOS versions by running image files of the old DOS floppy disks, and we can do the same. If we can produce an image file of a floppy disk with our boot sector on it, then we’re good to go!
Now would be a good time to download and install Bochs if you haven’t already done so.
Making a disk image
The final tool we’ll need for now is tool that can help us create a disk image with a custom boot sector. rawrite is such a tool, but it’s not available for Windows (although here is an implementation for Windows, but it doesn’t take command-line argument so it can’t be used in an automated build process). I rolled my own at some point and the result was ImageFS (you can download it here). It is now also available on GitHub. Its usage is:
Usage:
imagefs [c/create] [image file name] [number of sectors]
imagefs [b/boot] [image file name] [bootsector file name]
imagefs [a/add] [image file name] [file] [more files]
imagefs [r/remove] [image file name] [file] [more files]
imagefs [d/dir] [image file name]
To create a disk image, do this:
$ imagefs c test.img 720
$ imagefs b test.img boot.bin
You’ll get:
$ imagefs c test.img 720
Create new image file [test.img] with [720] sectors.
Image opened, current size is 0 sectors.
Formatted 720 sectors with fill character ÷.

$ imagefs b test.img boot.bin
Write boot sector [boot.bin] to image file [test.img].
Image opened, current size is 720 sectors.
Warning: boot sector file (532 bytes) is larger than one sector (512 bytes).
- skipping excess bytes.
Boot sector copied successfully.
This creates an empty floppy disk of 720 KB and stores our boot sector on it.
Running the simulator
Now run Bochs. You’ll get the emulator’s start menu. From it, select “Disk & Boot” before you hit Start. Fill out the following:
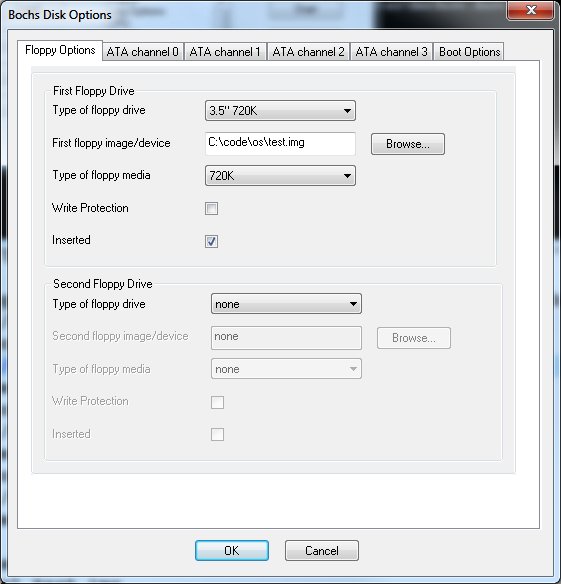
In particular, don’t forget to set your boot disk as “inserted”! Now hit Start and watch your code work:

Note that you can access Bochs’s log file to see the boot procedure in more detail, and if it crashes, you can see why.
If you want, you can actually run this code from a real floppy disk on a real computer. For this, you’ll need rawrite to write your boot sector to the disk. After that, you should be able to boot your computer with it (if you actually have a floppy drive).
Summary
We now have the tools in place that we need to develop our boot sector further. The Bochs emulator allows us to test our code. In the next section, we’ll flesh out our boot loader with code that finds and loads our kernel file. Since we’ll be using multiple source files, we’ll also begin using GNU make to automate our build process.
Resources
- MinGW: home page, download
- Cygwin: home page
- Bochs: home page
- ImageFS: direct download