DRAWING LDRAW CONTROL LINES WITH OPENGL ES 2.0 USING A VERTEX SHADER
LDraw is a standard for defining LEGO parts and models that can be drawn in 3D on the screen using software. LDraw has been around since 1995 and contains specifications for tens of thousands of parts: everything from the 2x4 LEGO brick we all know to ultra-specific LEGO Batman gear.
The LDraw standard describes a file format for defining the 3D mesh of a part and its subparts. The format has features for triangles, quads and lines, and a very special kind of line: the optional line. In this tutorial, we are going to see how optional lines can be drawn in OpenGL ES 2.0 for Android using a vertex shader, thus offloading the math onto the GPU.
What is an optional line?
Take a look at these two visualization of the standard 2x4 brick found among the LDraw parts (known as 3001.dat).


In the first visualization, the stud cylinders have vertical lines that delineate its side polygons, like a standard wireframe representation. In the second visualiation, the vertical lines only occur at the side of the stud, giving a far prettier image.
This trick is done using optional lines. The LDraw specification explains optional lines as follows:
Line Type 5
Line type 5 is an optional line. The generic format is:
5 <colour> x1 y1 z1 x2 y2 z2 x3 y3 z3 x4 y4 z4Where:
colouris a number representing the colour of the part, typically this is 24 - the edge colour. See the Colours section for allowable colour numbers.x1 y1 z1is the coordinate of the first pointx2 y2 z2is the coordinate of the second pointx3 y3 z3is the coordinate of the first control pointx4 y4 z4is the coordinate of the second control pointWith an optional line, a line between the first two points will only be drawn if the projections of the last two points (the control points) onto the screen are on the same side of an imaginary line through the projections of the first two points onto the screen.
The optional line can be a difficult concept to grasp. The best way to demonstrate how they work is through a picture.
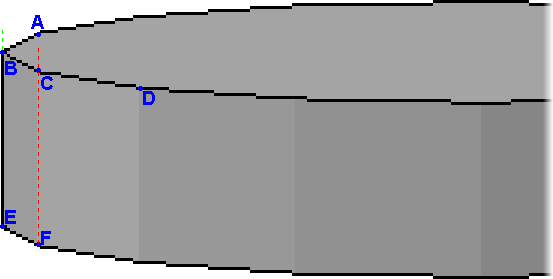
5 24 Bx By Bz Ex Ey Ez Ax Ay Az Cx Cy Cz
AandCare on the same side of the green line throughBE, soBEis drawn.
5 24 Cx Cy Cz Fx Fy Fz Bx By Bz Dx Dy Dz
BandDare not on the same side of the red line throughCF, soCFis not drawn.This serves to “outline” the edges of the curved surface, which is the intent of optional lines. As seen above, the control points usually can be chosen from already known points in the object. Since they are never drawn, they can be located anywhere, as long as they have the right controlling properties.
How to draw LDraw optional lines
The relation between the optional line’s start and end points and its control points determines whether it is drawn or not. This determination requires that we compute projections of all points, then perform comparisons to establish if both control points are on the same side of the optional line.
These computations can be done on the CPU before letting OpenGL ES 2.0 draw the control line, but they are quite expensive calculations, and the CPU is not as well suited to matrix multiplication as the GPU is. Some LDraw software, such as LDView, does indeed perform all computations on the CPU however.
Drawing LDraw optional lines with a OpenGL ES 2.0 vertex shader
It is also possible to offload all calculations to the GPU by writing an OpenGL ES 2.0 vertex shader to do the job. This approach was first implemented by Alex Taylor in OpenGL 1. What follows is a vertex shader for OpenGL 2.0 ES:
uniform mat4 uMVPMatrix;
uniform vec3 in_pnt1;
uniform vec3 in_pnt2;
uniform vec3 in_ctrl1;
uniform vec3 in_ctrl2;
attribute vec4 vPosition;

void main(void) {
  vec4 p1 = uMVPMatrix * vec4(in_pnt1, 1.0);
  vec4 p2 = uMVPMatrix * vec4(in_pnt2, 1.0);
  vec4 c1 = uMVPMatrix * vec4(in_ctrl1, 1.0);
  vec4 c2 = uMVPMatrix * vec4(in_ctrl2, 1.0);

  p1 /= p1.w;
  p2 /= p2.w;
  c1 /= c1.w;
  c2 /= c2.w;

  c1 -= p1;
  c2 -= p1;
  p2 -= p1;

  if (sign(p2.x*c1.y - p2.y*c1.x) == sign(p2.x*c2.y - p2.y*c2.x))
  {
    gl_Position = uMVPMatrix * vPosition;
  }
  else
  {
    gl_Position = vec4(0, 0, 0, 0);
  }
}
In this shader, the first two vertices of the control line (its start and end point) are passed in as a vertex array attribute vPosition, as normal when drawing a line.
The start point, end point, control point 1 and control point 2 are also passed in as uniform values (in_pnt1, in_pnt2, in_ctrl and in_ctrl2) respectively. Uniform values are unchanged each time the vertex shader is called, which is once for each of the two vertices on the line.
All uniform points are then multiplied by the model-view-projection matrix to get their final projections. A bit of math compares the points to see whether both control points are on the same side of the line, and the shader decides whether to draw the line or not.
If the line is to be drawn, the final vertex positions are calculated as in a normal vertex shader. If the line must be hidden, all vertices are set to (0,0,0).