READING/WRITING EXCEL FILES WITH C# INTRODUCTION TO NPOI
There’s often a scenario in .NET application development where you need to read data from an Excel file, or produce one. Quite a few libraries are available, but there’s one that shines: NPOI. It’s a C# port of the POI Java project by Apache, and contrary to some of its competitors, it’s free, it’s open source, and it’s a stand-alone implementation, that is, no interop. Users won’t need to have Excel installed for your app to talk to it through COM. In short, it’s lovely. There is, however, not really any quickstart documentation available, so this post is all about getting you up to speed with NPOI as quickly as possible.
Why you would want to use NPOI
In .NET, it’s eminently possible to read or write Excel or Word files without installing any third-party libraries. In fact, it’s easy. You simply reference the Microsoft.Interop assemblies, and suddenly you’re able to create Workbook instances, with rows, cells and whatnot, just as if you were programming VBA against Excel. The downside is that this only works if your user actually has (the required version of) Excel or Word installed, and it can be slow, because an instance of Excel/Word is fired up in the background to execute your request. I’ve had projects where this failed in cases where either Excel wasn’t installed, it was an older version, or the user had Excel open and it somehow blocked communication. Hardly an ideal situation.
With NPOI, there are no such dependencies. The library knows how to read and write binary Excel/Word files, and that’s that. Furthermore, it supports both the old Excel BIFF format (.xls) and the newer Excel format (.xlsx), giving your software a chance to read (and write) older files. It’s got support for most Excel features - to a point. Much like PHPOffice/PhpSpreadSheet - another library that deals with Excel files, but in PHP - the basics are there but you’re out of luck as soon as you hit charts and the like. Still, you wouldn’t typically need to produce Excel files that are that complicated.
Installing NPOI in your project
NPOI is hosted on GitHub, but it’s available as a NuGet package, making it a breeze to install it in your project in Microsoft Visual Studio. To do so, right-click your project and Manage NuGet Packages. Here it is in Visual Studio Community Edition:

Visual Studio will open its NuGet packages management window. You’ll see any currently installed packages, and there’s an option to Browse packages. Use the search box there to find NPOI and you’ll be presented with a number of matches. The first one is the one you want:
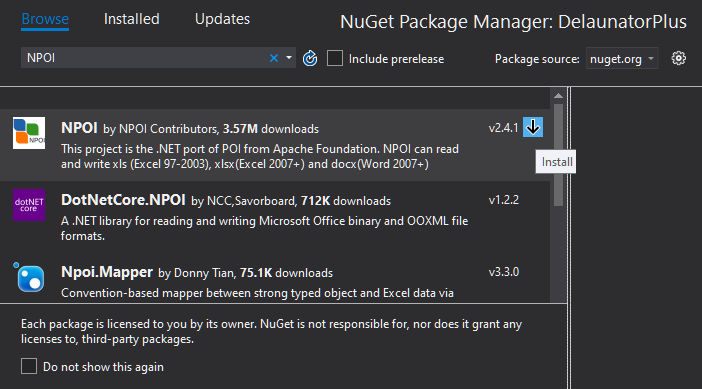
Click the highlighted array next to the package to install it in your project. It will automatically be added to the project’s references, and that’s all you need to do to start using NPOI.
Opening an Excel workbook for reading with NPOI
Let’s get on with it. In order to read data from an Excel file, you’ll first need to open it. This is where you’ll find that NPOI supports two flavors of Excel: XSSF and HSSF. The former deals with .xlsx files, while the latter is for .xls files. They’re implemented in such a way that as long as NPOI knows which file type it’s currently dealing with, you’ll always work with NPOI the same way.
If your application should be able to read data from both .xlsx and .xls files, I find that it’s simplest to try and open the input file as XSSF, and if that fails, fall back to HSSF. For example:
using NPOI.XSSF.UserModel;
using NPOI.HSSF.UserModel;

// Attemps to read workbook as XLSX, then XLS, then fails.
public IWorkbook ReadWorkbook(string path)
{
  IWorkbook book;

  try
  {
    FileStream fs = new FileStream(path, FileMode.Open, FileAccess.Read, FileShare.ReadWrite);

    // Try to read workbook as XLSX:
    try
    {
      book = new XSSFWorkbook(fs);
    }
    catch
    {
      book = null;
    }

    // If reading fails, try to read workbook as XLS:
    if (book == null)
    {
      book = new HSSFWorkbook(fs);
    }
  }
  catch (Exception ex)
  {
    MessageBox.Show(ex.Message, "Excel read error", MessageBoxButton.OK, MessageBoxImage.Error);
    this.DialogResult = false;
    this.Close();
    return;
  }
}
This method takes a file path, and tries to open the input file as .xlsx. If that fails, it attempt to open it as .xls. If it still can’t read the file, something else is going on: a corrupt file, the file does not exist, etc. The upshot is that you’ll get back a workbook instance, which can be either XSSF or HSSF, but both implement the IWorkbook interface, which is all you’re interested in.
Note that the flags for the FileStream in this example are set in such a way that you can still read the workbook if it happens to be currently open in Microsoft Excel.
Creating a blank NPOI Excel workbook
When you’re creating an NPOI Excel workbook, you’ll need to decide in what format it’ll be in when it’s exported to file: XSSF (the newer .xlsx format) or HSSF (the older .xls format).
For .xlsx, you do this:
using NPOI.XSSF.UserModel;
IWorkbook workbook = new XSSFWorkbook();
For .xls, you do this:
using NPOI.HSSF.UserModel;
IWorkbook workbook = new HSSFWorkbook();
Note that only when you’re creating the workbook, you’ll need to tell NPOI which format to use (XSSF or HSSF). After that, the IWorkbook interface works the same for both formats.
A blank workbook is actually really blank: it doesn’t have any worksheets. In order to create a worksheet, do this:
ISheet sheet = workbook.CreateSheet("My sheet");If you don’t create any sheets, Excel won’t be able to open your saved workbook. Besides, you’ll need an ISheet instance anyway to create any rows and cells.
Saving an Excel workbook with NPOI
Saving an NPOI workbook to a disk (or another medium) is very simple.
For .xslx file, you would do:
using NPOI.XSSF.UserModel;

IWorkbook workbook = new XSSFWorkbook();

// ... write some data to the workbook ...

using (FileStream stream = new FileStream("outfile.xlsx", FileMode.Create, FileAccess.Write))
{
  workbook.Write(stream);
}
It doesn’t get any more straightforward than that. An IWorkbook can write itself as binary data to a stream, be it a FileStream or a MemoryStream, any stream. Please note that this code may throw an exception if the file couldn’t be written, which typically happens if the file exists and is currently open in Microsoft Excel.
For an .xls file, do this:
using NPOI.HSSF.UserModel;

IWorkbook workbook = new HSSFWorkbook();

// ... write some data to the workbook ...

using (FileStream stream = new FileStream("outfile.xlsx", FileMode.Create, FileAccess.Write))
{
  workbook.Write(stream);
}
Note that only when you’re creating the workbook, you’ll need to tell NPOI which format to use (XSSF or HSSF). After that, the
IWorkbookinterface works the same for both formats.
Creating rows and cells
An NPOI Excel worksheet consists of rows, and rows contain cells. In other words, you need a row to work with its cells. The concept of column isn’t as important.
In order to create rows and cells, you’ll need to create a worksheet first if you haven’t already:
ISheet sheet = workbook.CreateSheet("My sheet");Given an ISheet instance, this is what you do to create a row with two cells in it:
IRow row = sheet.CreateRow(0);
ICell cell = row.CreateCell(0);
cell.SetCellValue("Hello");
cell = row.CreateCell(1);
cell.SetCellValue("World");
If you’d like to have additional rows, you’ll have to create them one by one. If you want a blank row, create one with no cells in it. The rows behave much like a non-uniform array. One row with three cells, the next with just one cell, another with zero cells, and finally one with six cells. Put another way, it’s not a grid.
The first row has index 0, as does the first cell in a row.
The SetCellValue method of ICell has several overloads. This is because NPOI looks at the type of the value your storing in the cell to determine the Excel cell type. You can override this my using the IRow.createCell(int columnIndex, CellType type) method, though.
Autosizing columns in an NPOI Excel workbook
After saving your NPOI workbook to an Excel file, you may find that in Excel all your columns have the same width, and some of the content may be clipped. (It’s there of course, but you’ll need to make the columns wider). Your Excel file will look a lot better if you size the columns to their content. This can easily be done.
Here, we autosize the first 20 columns of a worksheet to their content:
for (int i = 0; i <= 20; i++) sheet.AutoSizeColumn(i);In my experience, this works well after you’ve filled the rows and cells with content.
Using styles (bold, italic, etc.) in an NPOI workbook
If you’d like make a cell bold, it isn’t as simple as cell.Bold = true. Instead, you must create a style, and then apply that style to a cell.
In order to make cells bold, we can define the following style:
IFont font = workbook.CreateFont();
font.IsBold = true;
font.FontHeightInPoints = 11;
ICellStyle boldStyle = workbook.CreateCellStyle();
boldStyle.SetFont(font);
This gets us an ICellStyle instance, which is available throughout the workbook (that is, on any worksheet). We can apply it to a cell like this:
cell.CellStyle = boldStyle;Further examples
I hope this gets you started quickly with NPOI. If you’d like to learn more, there are many samples available on NPOI’s GitHub. It’s best to download the entire directory, then open the Examples solution in Visual Studio.
Happy coding!